Now that the animation is set up, it's time to start creating poses. A key pose is an important point of motion, such as the moment a player jumps or begins to swing a tool. Animations can have one or more key poses.
When thinking of your own animation, imagine breaking it down into a set of key poses. For this example, we'll guide you how to create a celebration jump with these poses. Your own animation may have more or less.


The process of animating involves moving and rotating avatar parts to create key poses. When the animation runs, Studio connects the poses into a smooth motion.
Setting a Neutral Pose
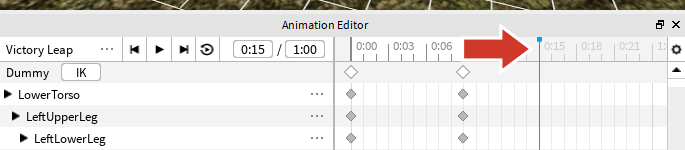
Used at the start and end of this animation, the neutral pose shows the player at rest. So that the animation begins with the player at rest, add a keyframe at the start. In the process of animating, keyframes store information on how parts are positioned.
In the Animation Editor timeline, right click on the first track and select Add Keyframe Here. This creates keyframes for each part of the player.


Creating the Second Pose
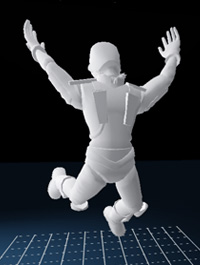
The second pose shows anticipation as the player crouches before leaping. Depending on your animation, the second pose may be different.
Make sure the rig is selected. Then, click on the top bar to set the animation time to a third of the length (e.g. 0:09).

Use the Rotate tool to start posing the rig. One way animators pose is to start with parts connected to the torso, like the shoulder. Then, move out to parts like the hand.
For this animation, the player will crouch before jumping. If you're doing a different pose, your rig may need to be moved differently. To move the rig:
- Switch to the Move tool by pressing R.
- Click the LowerTorso part (either in the rig or animation hierarchy) and position the body slightly down. Moving this part moves the entire rig.
Continue to pose the rig, switching between Move and Rotate by pressing R.


Creating the Third Pose
The next set of keyframes will be near the middle, showing the most extreme motion of the animation. In this animation, the avatar will be at the highest point of their jump.
Set the animation time to the middle by clicking on the top bar.
Animate the pose using Rotate and Move like below. As you work, exaggerate movement (spread arms out wider, twist the head, etc) to make the animation more clear and exciting.
Front View 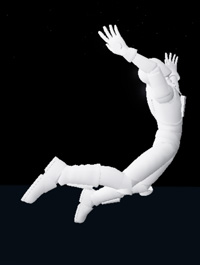
Side Angle View


Adding the Last Pose
For the last pose, copy the first pose and paste it at the end. While you could customize the last neutral pose, this is a quick way of returning the animation to its starting point so it loops smoothly.
Select the top keyframe in the timeline for the first pose. Be sure to select all keyframes at that point, then copy them (Ctrl + C or ⌘ + C).
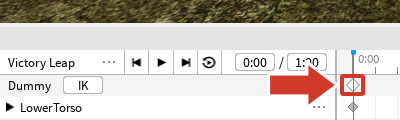
Move to the end of the animation (1:00 in the example) by clicking on the timeline or entering that value in the first box of the position indicator.
Paste the keyframes (Ctrl + V or ⌘ + V).


Testing the Animation
Seeing an animation play more than once can make it easier to spot changes you want to make.
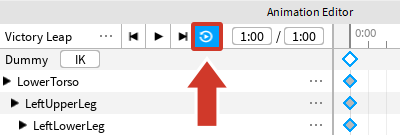
Toggle Looping on to ensure the animation playback loops.
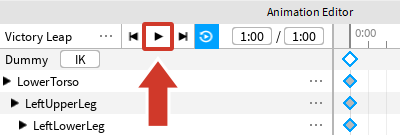
Press Play.


Improving and Exporting
With the keyframes created, take time to make the animation more satisfying by adding or fine-tuning frames. Below are some optional ways to improve animations.
Adding More Poses
Extra poses can add subtle details that make an animation go from "just okay" to "looking great." Incorporate extra poses to exaggerate a motion, show anticipation, or communicate a character's personality.
For example, carefully watch the video below a few times. Notice how the animation on the right has more poses, which leads to a greater range of expression.
Moving Keyframes
Smooth out actions or make them feel more realistic by adjusting when keyframes happen.
Click a keyframe. You can either select an entire pose or individual parts.
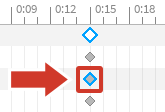
Selecting individual parts 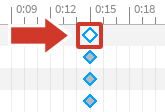
Selecting an entire pose Drag the keyframe(s) left or right into a new position. In the video below, notice how moving the animation allows it to feel more "snappy".


Exporting the Animation
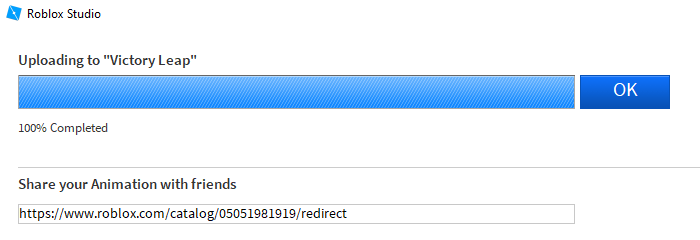
Once finished, export the animation so it can be added in-game.
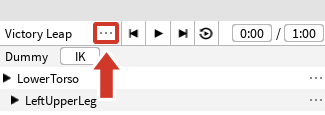
Click the ... button in the upper-left section of the animation editor window.
Then, select Export. Follow the dialog boxes.


You've made your first animation! Time to get that in-game.