The Animation Editor plugin allows you to design and publish custom animations on rigs.
A rig is an object with individual sections connected by joints. You can move these joints to create poses, and the Animation Editor then smoothly animates the rig from pose-to-pose. As long as all moving parts are connected with Motor6D objects, you can use the Animation Editor for both human and non-human rigs.
Interface

Media and Playback Controls
 | The name of the animation. |
 | Opens a contextual menu with the following menu items:
|
 | Moves the scrubber to the first key. |
 | Moves the scrubber to the previous key. |
 | Previews the animation in reverse. |
 | Pauses the animation. |
 | Previews the animation. |
 | Moves the scrubber to the next key. |
 | Moves the scrubber to the last key. |
 | Toggles looping for the animation. |
 | The position indicator that displays the timeline unit for the position of the scrubber in seconds:frames. |
Timeline
 | A scrubber that marks the current frame position. |
 | Time units that allow you to move the scrubber to a precise time unit. |
 | A keyframe that marks the change in position or orientation of a part. |
 | Either expands or contracts the time unit marks. |
 | Opens a contextual menu with the following menu items:
|
Track List
 | The name of the rig. |
 | Opens the Manage IK window. |
 | Opens a contextual menu of additional tracks you can add to the track list. |
 | The track displaying the name, position, and rotation of the part that has been moved or rotated to a new position or orientation. |
 | Opens a contextual menu with the following menu items:
|
Creating an Animation
You can only create animations using rigs. If you don't have a rig available, insert a pre-built rig using the Rig Builder plugin. The pre-built rigs have all of the basic parts and mechanisms to build a character animation.
If you have a rig, you can create a new animation for it using the following steps:
In the menu bar, navigate to the Avatar tab.
In the Animations section, click the Animation Editor to display its window.

Select the rig you want to create an animation for to display the creation dialog.

In the Animation Name field, enter a new animation name, then click the Create button. The Animation Editor window displays the media and playback controls, timeline, and track list.

From here, you can begin creating poses for your rig and modifying the animation settings, such as looping the animation or setting its priority.
Creating Poses
An animation consists of different poses, or specific positions and orientations of Bone or MeshPart objects within a rig. You can create poses by moving or rotating bones or meshes, such as the rig's hands, feet, or torso. After you create multiple poses on different positions of the timeline, the Animation Editor runs between them with your easing settings to smoothly animate the rig from pose-to-pose.
For example, a simple animation where a humanoid character turns to look 45° to the left has two poses:
- The initial position looking forward.
- The turned position looking left.
To create a pose:
In the Explorer window, select the rig and expand its child instances to access the bones or meshes.
In the Animation Editor window, navigate to the timeline, then click-and-move the scrubber to the frame position where you want to set the pose. By default, Roblox represents timeline units as seconds:frames and animations run at 30 frames per second. For example, 0:15 indicates ½ second.

In the viewport, hover your mouse over rig and select a bone or mesh. You can also select the ⊕ icon on the timeline and click Add All to add all bones or meshes to the animation.

Move or rotate the bone or mesh to a new orientation. For bones, you can rotate them to pose the rig along the created bone joints.
Continue moving or rotating bones or meshes until you get the desired pose. Whenever you adjust a specific bone or mesh, a new track displays in the track list, and a new keyframe displays on the timeline for that bone more mesh at that specific frame position.

When you're ready to preview the animation, you can either:
- Navigate to the Media and Playback Controls, then click the Play button.

- Or press the Spacebar.


Keyframes
Once you create basic poses for a rig, fine-tuning individual keyframes can significantly improve the final animation.
Adding Keyframes
Whenever you change a part's position or orientation, a new keyframe displays on the timeline. You can also add keyframes to a timeline through the following methods.
To add a keyframe for a single part of the rig:
Navigate to the timeline, then move the scrubber to a new position.
In the track list, navigate to the part's track and click the ⋯ button. A contextual menu displays.

Select Add Keyframe.
To add a keyframe for multiple parts of the rig:
Navigate to the timeline, then right-click in the dark region above the tracks. A pop-up menu displays.

Select Add Keyframe Here.

Note that the keyframes insert at the frame position closest to where you click, not at the position of the scrubber.
Moving Keyframes
You can increase or decrease the amount of time between keyframes by moving either individual keyframes or every keyframe in a frame position.
To move a single keyframe:
Navigate to the timeline and click on any gray keyframe. Both the gray keyframe and the white keyframe are now surrounded with a blue border.

Click-and-drag it to a new frame position.

To move every keyframe in a frame position:
Navigate to the timeline and click on the white keyframe in the dark region above the tracks. Every keyframe in the frame position is now surrounded with a blue border.

Click-and-drag it to a new frame position.

Duplicating Keyframes
You can duplicate either a specific keyframe or multiple keyframes for multiple parts into a new position in the timeline. This is particularly useful for when you want to
To duplicate one or more keyframes:
- Navigate to the timeline and select one or more keyframes. Every selected keyframe is now surrounded by a blue border.
- Press CtrlC (⌘C). Every selected keyframe copies to your clipboard.
- Move the scrubber to a new frame position.
- Press CtrlV (⌘V). The keyframe(s) paste into the new frame position.
Deleting Keyframes
To delete one or more keyframes, select the keyframe(s), then press Delete or Backspace.
Optimizing Keyframes
Animators can often generate many keyframes during the course of animation, especially when using various animation tools and features. To help reduce the number of unnecessary keyframes and make it easier to animate on the timeline, the Animation Editor provides tools for automatic and on-demand keyframe optimization.
Automatic Optimization
The Animation Editor automatically detects and removes unnecessary keyframes when creating facial animations and when promoting a keyframe animation to a curve animation.
If 3 or more consecutive keyframes have the same value in a track, the animation editor removes the intermediary keyframes and keeps only the first and last keyframes.
If the track only contains keyframes with default values, such as an Identity Cframe, or a 0 value for a curve animation, the entire track is removed from the animation.
On-Demand Optimization

During animating, you can use the Animation Editor's Keyframe Optimization tool to quickly reduce the number of unnecessary keyframes. Keyframe Optimization prioritizes the least impactful keyframes first. You can adjust the number of keyframes using the slider.
While using the slider, you can preview the animation and scrub through the timeline to check your animation but you can not perform editing operations, such as changing keyframe values or adding tracks.
To access the Optimize Keyframes tool:
In the Animation Editor, click **⋯** button and select Optimize Keyframes. A dialog box with a slider displays.

Move the slider to the desired number of keyframes. You can preview and playback the animation to verify the optimization.

Click OK when complete.


Easing
For each keyframe in the Animation Editor, you can choose both an easing style and an easing direction.
Easing Style
Easing style is the rate at which an animation moves between different frame positions within the animation. By default, a part will move and/or rotate from one keyframe to the next in an even, steady motion known as linear easing. In the following video, linear easing makes the character's turning animation appear stiff and robotic.
While that may look appropriate for some motions, compare the following video where cubic easing makes the animation of the character's motion appear more natural.
To change the easing style for one or more keyframes:
Navigate to the timeline and select one or more keyframes. Every selected keyframe is now surrounded by a blue border.
Right-click on a keyframe with a border. A pop-up menu displays.
Hover over Easing Style, then choose from the following options:
- Linear - Moves at a constant speed.
- Constant - Removes interpolation between the selected keyframe and next keyframe. The animation will "snap" from keyframe to keyframe.
- Cubic - Eases in or out with cubic interpolation.
- Elastic - Moves as if the object is attached to a rubber band.
- Bounce - Moves as if the start or end position of the tween is bouncy.
Easing Direction
Easing direction defines which end of the animation movement is affected by the easing style. By default, the motion is slower at the beginning and faster toward the end of the animation.
To change the easing direction for one or more keyframes:
Navigate to the timeline and select one or more keyframes. Every selected keyframe is now surrounded by a blue border.
Right-click on a keyframe with a border. A pop-up menu displays.
Hover over Easing Direction, then choose from the following options:
- Out - The motion will be faster at the beginning and slower toward the end.
- InOut - In and Out on the same tween, with In at the beginning and Out taking effect halfway through.
- In - The motion will be slower at the beginning and faster toward the end.
Looping an Animation
To make an animation automatically loop, navigate to the Media and Playback Controls and click the Looping button.
Setting a Priority
An animation's priority dictates when it will play in an experience. For example, if you play an animation with a higher priority than another animation that's already playing, the new animation will override the old. For example, a "jump" animation should take priority over an "idle" animation so that a character doesn't perform both at the same time.
Roblox uses seven levels of priority, ordered here from highest to lowest:
Action4
Action3
Action2
Action
Movement
Idle
Core
To set an animation to a different priority:
Navigate to the Media and Playback Controls and click the ⋯ button. A contextual menu displays.

Hover over Set Animation Priority, then choose your desired priority setting.
Saving an Animation
When you save an animation, Studio saves it as a KeyframeSequence object in ServerStorage and adds a reference to your rig object. Saving your animation is meant to preserve your animation progress and work. If you intend to use an animation, export it before referencing the published animation in your experience.
To save an animation:
Navigate to the Media and Playback Controls and click the ⋯ button. A contextual menu displays.
Select Save or Save As to save the animation with a reference added to the AnimSaves object.


Accessing Local Data
Roblox saves animation data locally to ServerStorage to preserve your animation work. In most cases, your experience shouldn't directly access this local data and instead should reference a published animation.
In the rare cases that your experience requires accessing local data, reference the value of the ObjectValue in your rig's AnimSaves folder rather than directly accessing the ServerStorage. See the following examples:
Access local animation data
Incorrectly access local data
Migrating Legacy Data
The Animation Editor previously stored animation objects directly within a rig, not within ServerStorage. If your experience references legacy animation objects in a rig, you can migrate this data to ServerStorage using the animation migration tool, allowing you to access local animation data in the same way.
To migrate your legacy animation data:
With the Animation Editor, select a rig with older animations that aren't saved in ServerStorage. A migration window displays.
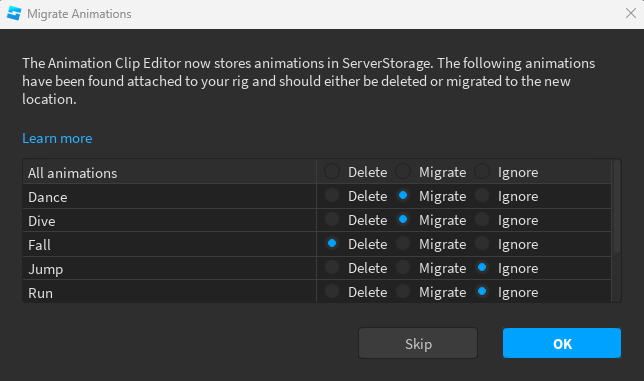
Select Delete, Migrate, or Ignore for each detected animation.
- Delete: Delete animations that are already published or no longer being used.
- Migrate: Migrate animations that are still in progress or that haven't yet been published.
- Ignore: Ignore animations if you have yet to update your experience's code to access local data from ServerStorage. Once updated, migrate these animations.
Press OK when complete.

Exporting an Animation
When you export an animation to Studio, it becomes available for use in all experiences. This means that you only need to create an animation once, then you can reuse it as many times as you want.
To export an animation:
(Important) If the animation will be used to replace a default character animation like running or jumping, rename the final keyframe End as follows:
Right-click the final white keyframe symbol in the upper bar region and choose Rename Key Keyframe from the contextual menu.

Type End (case-sensitive) into the input field.
Click the Save button.
Navigate to the Media and Playback Controls and click the ⋯ button.
Select Publish to Roblox from the contextual menu.
In the Asset Configuration window, enter an animation title and optional description.
(Important) If the animation will be used in any group-owned experience, select the group from the Creator field.
Click the Submit button.

Once the upload is complete, you can copy the animation's asset ID from the Toolbox for scripting custom animations or to replace default character animations, as outlined in Using Animations.
- Click the Creations tab and select Animations from the dropdown menu.
- Right-click the desired animation and select Copy Asset ID from the contextual menu.
- See Using Animations for instructions on how to play the animation from a script or use the animation as a default character animation.